Ingrid bra and Great Bra Sewing Bee

I participated again in the Great Bra Sewing Bee from August 4 through 8th. It is a great learning experience.

I did the sew along for the Ingrid bra. I had bought the kit from Bra Builders. The kit included the power net, a cotton lycra knit, stabilized sheer tricot, twill tape, hook & eye closure, and all the elastics needed to make the bra.Ingrid is a pattern from Pin Up Girls (Bra Makers Supply) for a wireless bra which has been out since 2018.

I measured a BCD of 5inches and about a 35 inch ribcage. So I used the 5 for the cups and a band of 36 inches.

I mainly followed Linda Crawford’s sew along for the Ingrid with the Great Bra Sewing Bee, so I really didn’t look at the instructions until I varied from what Linda did. Linda did the front closure. I wasn’t planning on a front closure but do like that the option is there if needed.

The padded strap was way too long. I took about 1 1/2 inches off the length of the padded strap.

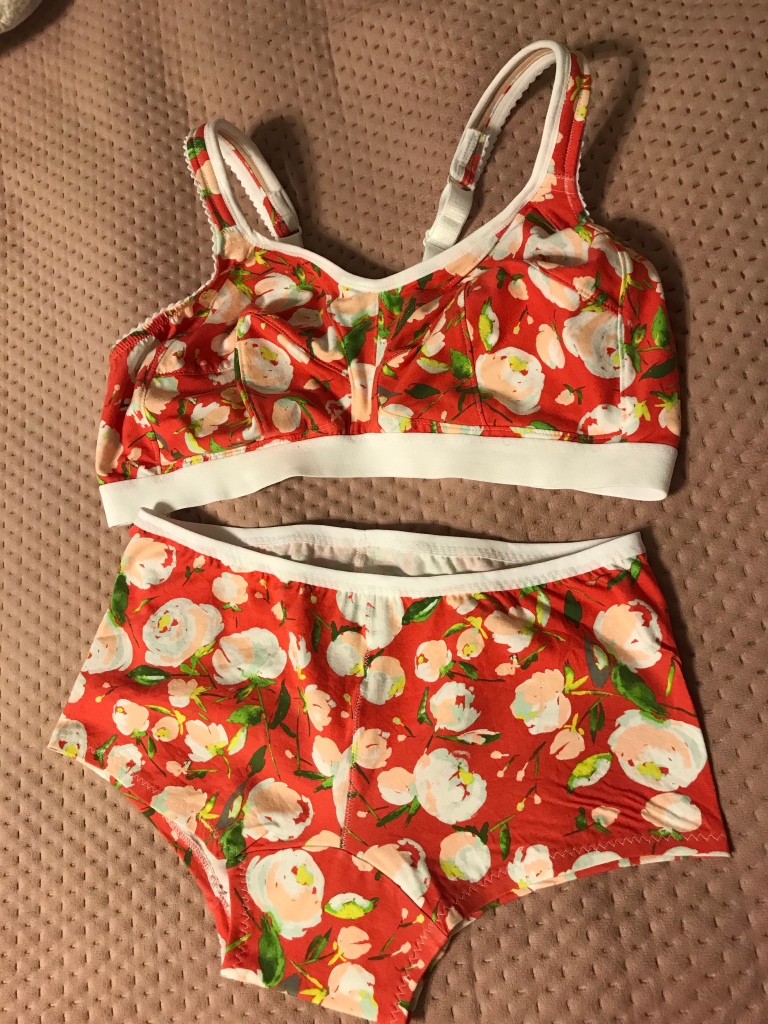
I have worn this Ingrid bra about 4 times. So far, I think that it fits fine without any further adjustments. I will go ahead and make another one to see if I still think it fits fine.

Bravo Bella Bottoms 2- Boy shorts

It was time to try out a new underwear pattern. This time I picked Bravo Bella Bottoms 2 pattern. Out of the three options, I went with the boy short style. I have made three pairs since I traced this pattern out. I traced out a medium.

The main fabric for the first pair is a cotton model jersey. I went with the fold over elastic for the waist option as that was what I had on hand. I decided to add a lace accent to the front. I left the light purple fabric behind the lace instead of cutting it away. The pattern didn’t include the lace accent. I added that myself.

I used a with fold over elastic for the second pair. This one is a rayon modal jersey. This one is much lighter weight and thinner than the lavender pair. It isn’t my favorite between the ones I have made.

The last pair made with this pattern is from a bamboo Lycra that I got from Bra Builders. It is a bit heavier fabric with nice drape and worked well for this pattern.

I plan on retracing the pattern out and adding an elastic allowance to the top so I can have the option of using the picot elastic.

Semblance Shawl

This shawl is finally finished! It is the 5th ever project I have made.

As I am just learning, this was one very large project. It is assumed that you know how to place markers for the lace pattern. There are no place markers or tips on placing them. Actually when I started, a friend helped me learn where to place the markers.

The lace repeat was over 12 rows and it was repeated 12 times. The added stitches at the end of the rows were just a knit front/ back so it was easy enough to increase.

Emerald Erin Tuesday Boyshorts

I did one of each style, the classic and the solid front.  I used a size 12.  The fabric is cotton/ lycra from Art Gallery and the elastic is 3/8 inch plush picot elastic.  

The pattern went together well.  I was able to sew this together easily.  Instructions were good to follow.  

The way the pattern is formatted does make it harder to grade sizes from waist to hip.  I probably won’t consider this pattern for my mom as I know that I need to grade out for the waist.

I have made about 7 more pairs of Tuesday boy shorts since the first two in August.  Most have all been the solid front style.  All have been bamboo jersey or cotton lycra jersey.  Tuesday boy shorts give great coverage which I like in my underwear.  My other favorite pattern is the Madalynne Simplicity patterns 8229 and 8228.  I can see the Tuesday boy short pattern getting a lot of use.  

Missouri Star Quilt- Crosswalk

This is the first quilt I have made. I have made a couple trips to Missouri Star Quilts in Hamilton, Missouri with my sewing group. One of the trips, I picked up about 4 issues of the Block Idea book. The Crosswalk quilt pattern is in Spring Volume 3: Issue 2 (2016). I didn’t see a skill level rating in the book, but the video tutorial list this as easy. I put the link to the video tutorial at the bottom.

Overall, this probably took me about a year to make. The pattern wasn’t too hard. All the strips were sewn in groups of 5 then cut to size. Those then were paired with right triangles. The longest part was actually the quilting. I went simple and just followed the crosswalk pattern and the different borders.

The Crosswalk Quilt — Quilting Tutorials

I still have one more quilt to finish up.

Miss Maggie Handbag by Emmaline

I was looking for something to make that would expand my knowledge. In the end, I decide to try and make a purse. I wasn’t sure about sourcing all the materials and interfacing by myself so I went with a kit from Emmaline Bags for the Miss Maggie Handbag.

Miss Maggie instructions were well done. It is a good starter purse pattern. Only working on it a couple hours a day, I was able to complete this in a little over a week. The hand sewing the handles on slowed me down.

Plus I added am interior zipper pocket to the pattern; it just needed an extra pocket. That extra pocket had to have fabric pieced together to make it. I only had scraps left after making it.

I like the pattern but I am not sure I would make it again. The size of the purse is ok but it is just a bit small for me. And I realized, I am so use to having a pocket on the exterior to put my keys into. This one just doesn’t have it.


Ohhh Lulu Ultimate Sleep Mask

I was needing a quick simple project for in between projects.  After flipping through what I had in patterns, I decided to try out Ohhh Lulu’s Ultimate Sleep Mask.  I have never used a sleep mask before so was a bit leery of whether or not I would use it.  I didn’t want to purchase anything for this project I was unsure of.  In the end, I did buy a couple of sheets of felt to use as the batting.  That ended up being a $1.00 investment in this experiment which seemed much more reasonable than getting batting.

I used a knit fabric on the outside.  The green one was made first and is cotton Lyrca knit.  The black floral is from a scrap of DTY.  The lining fabric is nylon tricot.  The felt was the batting.  I used scrap denim for the black cotton interlining.  All except for the felt came from the scrap box.

Since I was using a knit, the elastic strap was a little more trickier to put in.  For the first mask, I attached it to the outside knit then stacked everything together.  The elastic strap was uneven when I was done.  So I did take the seam ripper to it to fix the elastic strap.  For the second one, I stacked the outside knit with one of the felt pieces.  Then I attached the strap and followed the directions.  The elastic didn’t shift in this one.  This probably isn’t a problem if you are using cotton woven like asked in the pattern.


Samantha’s Sailor dress


Samantha’s turn for a new outfit.  Back to my faithful Joan Hinds’ “Heritage Doll Clothes” book.  I used quilting cotton I had at home for her entire outfit.  As before, the instructions in the book are excellent.  The pattern went together easily.  The only piece I re-did was placing the collar so it was more even.


I did not use the suggested ribbon for the neckline area.  I did a bias strip of fabric.  I used a 1″ thick bias strip then folded it in half a couple times.  As for the blue “belt”, that I ended up hand stitching at the top so it would lay better on the dress.

The collar tie is also the same quilting cotton.  I just had to make the fabric tube then experiment until I got a reasonable length.


Saturn Connections

I was looking for a project that would use beads that I had in my stash already.  This is the Saturn Connections from April 2017 issue of Beadwork Magazine.

After looking at a lot of choices, I decided to go with the silver grey beads, rose gold beads and the pink seed beads.

The links are made from herringbone stitch and ladder stitch.  I didn’t find any trouble with following the directions.

The one recommendation for anyone doing this project is to add a little length.  The length given is about 7inches.  It does fit, but I do like my bracelets a little bit looser.  This one is about a half inch wide so that is pretty substantial.  I find the thicker the bracelet, the more snug it feels on my wrist even if it is 7 inches.  My wrist is about 6.5 inches around.

Rebecca’s New Outfit- Pemberley Threads Anne

I had seen Pemberley Threads mentioned in the No Drama Doll Sewing Group on Facebook.  Pemberley Threads has what I love which is historical clothes for dolls.  So I chose out Anne as my one pattern to buy and try out.  Rebecca got to be the model.

I started with the skirt.  It is made from the rayon/ poly linen look fabric.  The skirt was easy to sew and went together without any problems.  I used the three thread overlock to finish the skirt seams.

Intermediate is probably an accurate description for the shirtwaist.  The shirtwaist did take twice as much time to make as the skirt.  I made version A of the pattern.

For it I used a quilting cotton.  The pattern does call for a bit of lace.  As I was using what I had at home, I did reduce the amount of lace to just the yoke trim.  I didn’t add the 4 half inch pieces to the yoke.

I found the gathering on the bodice to be the trickiest part.  I followed the recommendation in the pattern of tying a knot at the beginning of the gathers.  That did secure that end easily enough.  But the other side seemed to slip out of my pins as I was stitching the twill tape down.

Market Bag

I loved reading Barbara Pym’s “Excellent Women”.  When I seen this market bag. I thought immediately of Mildred and her string bag.

I followed the tutorial on By Hand London’s website.  It doesn’t give an overall size or a gauge so this probably isn’t very beginner friendly.  I used a size H hook (5mm).  In hindsight, I probably should have sized down to the G hook (4mm).

The tutorial uses up-cycled denim yarn.  I used Lion Brand Re-Up cotton which will probably have more stretch than the tutorial’s denim.

I didn’t like how you did the handles.  If I make it again, I may make them separately then crochet them on to the bag.  I used 5 rows on the handles to have something a bit more substantial.

3 books inside the bag

The double crochet row up at the top seemed too thin.

The pattern yields a large string bag with decent size interior.  But in the end, I just don’t love this bag and will probably take it apart to use the yarn for something else.  This is definitely more for an experienced crocheter who is able to adapt patterns to their needs.


McCall’s 6963

This McCall’s pattern has become a fast favorite.  As of right now, I have a dress, 5 sleeveless tops, and one long sleeve top from it.  I definitely have improved on the back neck finishing since I started using this pattern in October 2018.

Here is what I had originally written in October 2018:

I traced out a straight size 16 but I blended the view A cowl with view C cowl.  I was trying to raise the cowl from being too low.  I didn’t really succeed.  The cowl is still low but blending the 2 cowls together I think gave me a fuller cowl.  The fuller cowl does cover the top more but it is still a low cowl but wearable for me.

The size 16 was fairly close to the size I needed for my waist.  I ended up using quarter inch seam allowance for the side seams just so it wasn’t super skin tight.

I used some of the magenta ITY I had in my stash.  It does drape well for this top.  I used an overlock stitch from my sewing machine just to finish off the cowl edge.

Really the only trouble I had in making my version was the back of neck facing.  There are ripples in along the seam line.  I used clear elastic to stabilize the section instead of twill tape so that maybe the reason.  But otherwise, the top was easy to put together.

I took about 2 inches off the bottom and took about an inch and half hem.

The pink long sleeve top was probably made in March and was a straight trial of view D.  I remember I had to shorten the sleeves.  I may go back and slim the sleeve down some too so it is more wearable.

I completed the dress in June 2019.  It is view C in size 16.  I lengthened the top by 9 inches.  I had to shorten the sleeves by 2 inches and take a 2 inch hem on them.  Plus on the sleeves, I had to taper in the sleeve from the bottom to about the elbow so that the sleeves were slim.

The main goal was to get a sleeveless cowl neck top that I like.  So I traced out view C/D (the higher cowl neck) and did the adjustments to the arm scythe.  I raised it a quarter inch in the bottom and moved the shoulder in a quarter inch.  I did end up removing the quarter inch I raised the under arm area.


Rahel’s maxi skirt

Doll clothes are so much faster to get on the blog.  I do have a couple of items for myself but still need to get some more pictures done.  I really wanted to use the stripe t-shirt to make a maxi skirt for my Hearts for Hearts dolls.  As for patterns, my first thought was Liberty Jane’s mitered maxi but it didn’t come in the 14 inch size.  I did have the mitered maxi in the 18 inch doll size, so I turned to what I learned at Wren Feathers to size the pattern down for my Hearts for Hearts dolls.  I printed the pattern at 77% and checked to see if there was enough width in the waist to fit my doll and seam allowances.

I measured a total length of 9 inches for the waist, so there was enough for my doll and seam allowances.  I used a calculator to figure my waistband measurements.  Then I held the pattern piece up to my doll to make sure the pattern was long enough.  After all the preliminary checks were completed, then I cut out the skirt.

I made the entire skirt on my sewing machine.  I finished the inside seams with a zig-zag stitch.  The hem was basted then turned up and zig zag stitched down.

I used a piece of half inch elastic in the waistband.  It was 7 inches long.

Dell’s Cardigan- My AG Doll Creations “Karina’s Cozy Sweater”

Christmas I received a book on knitting stuffed animals but the biggest problem is that I couldn’t knit.  After a couple of Bluprint classes and a knitting session at sewing group lunch, I have actually been able to make a few items.  The first was a couple of doll scarves.  Then there was a hat for my dad so I could practice decreases.  Next was to learn increases.  I wanted a simple doll shawl but couldn’t find a pattern.  So in the end I decided on My AG Doll Creations’ “Karina’s Cozy Sweater” as it was described for confident beginner to intermediate.  It seemed like I could possibly make it.

The sweater is knitted from the top down.  Then the sleeves are finished.  After the sleeves, the body of the cardigan is joined so that you don’t have to sew the side seams.

I used Rooster Almerino DK in damson with number 6 Clover bamboo needles.  I think the yarn sort of hides the lace pattern you make.  The cardigan included knitting in front and back loop increases, yarn over increases, slip knit decreases and knit two together decrease.  The project was challenging as it was the 4th project completed.  

I didn’t include the buttons as I didn’t have anything that would work at home.

Ottilie Fascinator

I chose the Ottilie fascinator for my derby day hat.  This one was a bit more involved to make as I made the sinamay base from scratch also.  But it still wasn’t too hard to make.

Creating the base was the most involved part.  Most of the base was made during my breaks at work over 4 or so days.  Taping the wire ends was tricky.  So if I make bases again, I will probably get someone to help out with holding the wire.  I used masking tape and it worked but was a bit chunky.  Floral tape will be better choice.  I went with Mod Podge fabric stiffener.  My base took 4 coats.  I did this over 3 days on a Styrofoam head.

I had to create my own bias for the base and to make the bow.  First thing I did was pulled out a calculator and see how long the circumference of the 5.5 inch base was.  The 5.5 inch base needed less bias than I needed for the bow.  To determine how much sinamay I needed, I used a 45 degree right triangle to figure the side length needed.  In the end, I needed a 28 inch long piece of sinamay to make enough bias for the bow.

The instructions in the book for the birdcage veil were very well done.  I understood what it wanted me to do but I was slow and it took me 15 minutes to completely gather the netting.  The bow was easy to construct and I had it together in 30 minutes.

I have fine thin hair so that was not going to support the weight of a fascinator.  I decided to go with a head band wrapped in embroidery floss to match my hair color.  As it was the first head band I wrapped, the hot glue on the ends isn’t as neat as it could be.


Fascinator 1- Mariella

Last year I picked up a couple of fascinator/ millinery books to look through.  For the upcoming Kentucky Derby, I decided to make my mom and I a fascinator using Hannah Scheidig’s book “Fascinators: 25 Stylish Accessories to Top Off Your Look”.

The first fascinator was for my mom.  As her derby dress is purple, I knew that the color would be hard to match so I decided on a black and white theme instead for it.  I used the first pattern in the book, Mariella for her hat.  Since it was to be my first hat, I decided to go easy and I bought the sinamay bias from an Etsy store.

The pictures in the instruction are well done.  I used two colors so my Mariella fascinator came out similar but not exactly the same.  I found that it was easier for me to make a complete loop then twist the loop into the figure eight and sew.  After I had the larger white loop and the black interior one, I sewed them stacked together.  The smallest white loop is the last piece put on.  I overlapped the white bias and sew the overlap together.

The book suggest that this pattern is easy and will take about an hour to complete.  The easy skill level is very accurate.  However, the hour to complete may be very optimistic.  I think I probably have been closer to 3 hours.  Some of that is trying to determine if the loops look similar to the pattern and changing it from 1 color to 2 colors.  Another part of it is deciding the best way to put it on one’s head.  In the end, between the hair stylist, my mom and me, we decided her short curly hair could use a clip or bobby pins.  In the end, I hand sewed a small piece of sinamay to the back to slide either a clip or bobby pins in.

Another sewing related item I did last year was to invest in nice hand sewing needles.  I used a number 8 millinery needle from Tulip and that needle never bent at all.

Replacement dress


After a lot of consideration, I went with the circle skirt dress with contrast collar from Joan Hinds’ “Heritage Doll Clothes”.  I knew that I had used the book several times already and always had a decent outfit afterwards.  Pictures are behind just because it is harder to get great ones in winter; it was dark when I got home from work.

This is using the same fabric as used for the K&R Vintage dress that didn’t come out well.  The lining is some white quilting cotton.  And I bought some navy ribbon to make the bow belt.  After getting the ribbon, I realized the tiny dots are actually black and not navy like I thought.


The only major change I made was to not use the bias tape for the finishing of the collar and sleeve cuffs.  Instead I double cut the collar and the sleeve cuffs so I would have facings for them.

The ribbon belt length was decided after the dress was completed and then I trimmed it after I got a bow that I liked.


Cobblestone Sweater for Hearts for Hearts Girls


I was able to crochet a sweater for my Hearts for Hearts dolls!  I used Sweet Pea Fashions’ “Cobblestone Sweater”.

The Cobblestone sweater pattern is rated for advance beginner.  This is probably correct.  When I originally tried this, I did have some troubles with the single crochet ribbing.  I would forget and add a single crochet to the turning chain one.  As long as you feel comfortable making crocheted rows, this pattern wasn’t too bad.  Also, don’t over think the crochet chart.  I was confused when I went to do the shoulders sections if I was on the correct side.  But following the directions, everything came out alright.

I started with the crochet hook (size C) recommend on the 14 inch doll pattern but realized when I was halfway through the ribbing that it would not be long enough.  Since I had the 18 inch doll pattern also, I did compare the two and the 18 inch pattern recommends a size D hook.  I used that and was able to get the recommended size shown in the 14 inch pattern.  So I do believe that is a typo between the two patterns.  They both call for the same weight of yarn and the only difference I could tell was the length of ribbing needed to achieve the dimension required to fit the dolls.

The back closes with three snaps.


I think this would be easy to change-up into a sweater dress.  I think it would require adding about 8 to 10 more rows of the pattern to get the length needed just so you can follow the pattern for the shoulder area.

K&R Vintage- McCall’s 9958


I love that K&R Vintage takes old children’s patterns and makes them into doll sized.  I decided to try out one from 1939 for Kit.  I had previously used one for Molly and had great success with it.  However, it doesn’t seem like Kit is destined to get the same result. I definitely won’t recommend this one unless you want to take the time to fix it.

All the pattern notches and seams lined up perfectly which is great.

The part that I really don’t like is that the shoulders of the dress are about a quarter of an inch off of Kit’s shoulders.  It isn’t suppose to have dropped shoulder sleeves.  I think this is too much to just be a cutting or off sewing issue.

Below is how it looked before the side seams were brought in.

I pulled in the side seams at least  three-quarters of an inch.  At this point, it is probably as good as it gets.

I did as the pattern requested and checked the wrist measurement and the pattern piece provided looked like it would fit fine.  But in the end I had troubles getting it over Kit’s fingers.  I would have preferred to added some hook & loop fastener at the cuffs just to make it easier on me.

I decided I am not willing to try to make the necessary changes to the pattern to get a better fitting garment for Kit.  I do wonder if the original children’s dress had the same issues though.  I have not been able to find the inspiration pattern on the internet.  Kit will probably just get a different dress altogether.

Start of Marie Grace’s New Outfit

Over Christmas, I was able to make a couple of doll items.  Keeping a less formal look, I decided on a shirtwaist, skirt and jacket for Marie Grace.  As of right now, Marie Grace only got her skirt which was from the 1860s School Outfit from Joan Hind’s “Heritage Doll Clothes”.

The skirt is easy to make and probably should have waited until everything has been completed.  I didn’t make any changes to the pattern except for closure preference.  But realize that Marie Grace has her hoop skirt on underneath this skirt so the pattern works well on newer dolls with all the historical undergarments.

I use a light weight suiting fabric to make the skirt and hook & loop fastener for the closure not the hook & eye requested.


Liberty Jane King’s Canyon Peplum

Nahji’s outfit consist of the Liberty Jane mini skirt and the Liberty Jane King’s Canyon Peplum top.  I have already reviewed the skirt with Dell’s outfit.  So this will just be the King’s Canyon Peplum.

Intermediate sewing level is probably about right for this project.  It requires a light weight fabric which if you are not use to can cause problems.  I used rayon challis that I had left over in the scrap bin.  Rayon challis does require a lot of pinning as it is slippery.

As I really didn’t have any trim that I wanted to use it does seem a little plain on the front.  I probably should have used one of the decorative stitches from my sewing machine.  Or maybe I shouldn’t have done the split at the neck line.  I am not sure.

It fits Nahji well and really wasn’t hard to stitch together.  It does require having the right fabric suggestions to get a great drape.  I double rolled the peplum hem and that did cause it to stick out in the rayon.

Crochet It Shawl from Yarnspirations

It took about a month with an I sized crochet hook but I finally finished Yarnspiration’s “Crochet It Shawl”.  It took 2 balls of the country blue Caron simply soft yarn and 1 of the taupe color.  The pattern was free.

The pattern is rated as intermediate.  It is all single and double crochet stitches but I think it being a triangle is why it is at intermediate.  It definitely take time and counting on the pattern.

Crochet It Shawl pattern


Memories of Toby

Our beloved Toby who has been seen here on the blog a little passed away today at 15 years and 4 months.  Lala and I will miss you Toby.


Harajuku Skirt (Hearts for Hearts dolls)

Lauryce’s skirt has been done since early July .  But I have been horrible about taking time to take pictures.  There is at least 6 other doll items plus a couple of items for myself still needing pictures.

Lauryce got the Harajuku skirt from Liberty Jane.  It was in the Hearts for Hearts/ Les Corrolles section so not the Wellie version.

All I remember is that this was extremely fast to sew.  I think I had it completed in one evening from cutting to end.  I know that I would have done as much as possible flat (even the hem) then put the elastic at the waist.  Lastly was seaming up the back.

Lauryce’s skirt is from left over quilting cotton I had from the grey suit I previously made.  Her top is Liberty Jane’s baseball tee which was previously made.


More Hearts for Hearts Sewing- Liberty Jane patterns

Dell is up next.  Dell’s new outfit consists of Liberty Jane’s gathered t-shirt and Liberty Jane’s mini skirt pattern.

Dell’s t-shirt is made from ITY knit leftover from a dress I cut for myself (which is waiting to be put together).  I really like the finished t-shirt.  But my biggest complaint is that it didn’t include a neckband piece.  So instead of turning under and hemming, I cut out a band matching the width of the little arm cuffs and longer than the neck line length.  I basically used it as a facing and turned it to the inside and stitched down.

I just used the standard 2 rows of basting stitches for the gathering.  All the gathering was fairly easy even with the knit fabric.

The Liberty Jane mini skirt pattern is sized for Wellie Wishers and Hearts for Hearts dolls (14.5 & 14 inch dolls).  I had cut out four of view A from Kona cotton.  I only ended up with 3 skirts because I figured I needed to bring in the side seams for my Hearts for Hearts (since they are smaller than Wellies).  So the first skirt did not fit on my dolls and I was not going to go through fixing it.  After the first one, I used the recommended quarter- inch for side seams and the fit is fine for my dolls.

Now if you have a Wellie Wisher, you may want to consider including a bit more wearing ease so the skirt is easier to pull on and off.  In that case, my recommendation would be to get your extra width from the center front and center back seams.  For View A, I had to fold the front and back fabric pieces and then stitch in a faux felled seam.  That faux felled seam is where I recommend getting your desired width if necessary.

I did like how Cinnamon has you finish the side seams because it does give you a nice waistband finish.  It may not be the best method for complete beginners as afterwards, you have to sew the front waistband down in the round.  A small 6 inch or so waist is pretty tight to do in the round.  The American girl sized dolls are probably easier to complete like this.  For me, it was slow sewing and constantly trying to make sure I was able to move the skirt and able to see.

Simplicity 8574

Over Father’s Day weekend, several of the Hearts for Hearts girls got new outfits.  As I didn’t want to take away from Rahel’s bold necklaces, I decide to go with Simplicity 8574.  I did view A’s shirt and view B’s leggings.

The leggings used the same sueded ITY that I used for my McCall’s 6654 skirt.  Rahel’s t-shirt uses a cotton knit remnant that one of my friends gave me.

I really think this pattern is designed more in line with the Wellie Wishers sizing.  The shoulders and sleeves of Rahel’s top are just too big for her.  The sleeves would be easy enough to shorten, but I don’t think taking a 3/8th inch seam allowance on the armsythe will fix the shoulders being too wide.  I really don’t know the best way to fix the shoulder problem that Rahel has with this top.

Plus the top did not have a neckband piece.  It was another turn and hem type top.  I don’t feel like I get as nice of a finish this way.  So I cut a rectangular block about 1 inch wide and use it as a facing to finish the neckline.

The leggings are a bit baggy at the waistband.  The leggings should be much easier to adjust.  I think it should just be changing from a quarter-inch seam allowance to a bit over three-eighths seam allowance for the crotch seams.

After I finish up my purses for the Sew Powerful Purse project, I will probably make Rahel a different outfit.

Hearts for Hearts Liberty Jane Jeans

Tipi was the first doll to get a completed outfit (but that is because I used a previously made Wren Feathers gathered blouse).

Tipi’s pants are from Kona cotton.

I pretty much followed the directions of the pattern except for I did not want to insert my elastic in the round.  This time I left one side seam undone but finished off the in-seam so I would be able to hem the second leg easily.  After that, I inserted the elastic and tacked the end of it down.  The final side seam was pinned then sewn and finished with zig-zag stitch.  Side seam was trimmed and I feel that gave me a nice easy to make finish.

This small of a size may have been difficult to complete in the round on a sewing machine.  I am not sure I would want to hand sew it as you do need the waistband to be strong.  My hand-stitching may not be professional enough for this sort of task.

I finished all the seams off with a small zig-zag stitches then trimmed off the rest of the seam allowance (it wasn’t that much).

Butterick 6464 Skirt


Last summer I tried shopping for a RTW one but could not find anything I liked. So looking ahead to spring and summer, I decided I needed to make some knit elastic waist skirts.  After searching the pattern stash, I decided to use Butterick 6464.  It is from their Lisette collection.  This was probably finished early May but just now getting blog photo; weather was some of the problem.

I traced out a size 20. I could have sworn I measured myself correctly.  I think my problem was either the stretch material or I measured myself when I was having symptoms from endometriosis and this caused the difference.  So far, the endometriosis theory is the front- runner.  In the end, I took about 4 inches off all over so I should have traced a size 16 instead.

The fabric used first is a candy apple Ponte knit. With my Pfaff Ambition, it handled the Ponte better at a slower sewing speed.

I did not shorten the pattern when I traced it out. I knew I would most likely take off some length but I wanted to be able to see the skirt on before deciding how much should be removed.  I shortened it by an inch then took a 3 inch hem.

I later traced out a 16 one weekend. The following week, I spent cutting out Butterick 6464 skirts in grey, royal blue, and tan Ponte, plus able to cut a Liesl & Co Classic shirt and doll apron.

Over the weekend, I put on my “Home Fires” DVD and went to work on putting together my skirts. As for “Home Fires”, I still don’t agree with the decision to cancel the series.  But back to the skirts, I decided to top-stitch down each side on the center front and back panels.    As for the side seams, I ended up taking them in an inch (2 inches total).  This is a more reasonable amount based on fabric stretch, so I didn’t decide to re-trace out the size 14.


The skirts went together fairly quickly and I had all three completed by Sunday afternoon.


A bit Late- Simplicity 8365

I really should have thought about making Simplicity 8365 before the Kentucky Derby and the Royal Wedding.  But the thought never crossed my mind then.

In researching the pattern (which I did after I bought and cut the pattern out), I did come across the designer’s tutorial.  It was nice to see the pictures of the flowers being made.

I uses poly satins from Joann’s Casa collection and a block of tan felt.  As a warning, the rosewater pink satin I used was a bit heavy and made it harder to hand sew the roses, so be cautious on the weight.

As for the roses, I found it was easier to hand sew at the bottom as you were wrapping the fabric around.  I started with going through the entire bottom to secure it but eventually switched over to tacking the round to the previous one.

I covered the felt round with a piece of the satin.  On the purple hat I made my mom, I covered the felt before putting the netting on.  But for the second hat (which is the one shown) I decided to sandwich the netting between the satin and the felt.

There is a lot of netting for this hat.  For my hat, I trimmed off about half of the netting.  Otherwise, I think it stuck out about 10 to 12 inches above the base.

All the hand sewing of the flowers convinced me to look for a thimble.  By the end of sewing the flowers on, my poor thumbnail ached.  Since I got a thimble, I decided to invest in hand sewing needles too.  So I will post a review of those items when I try them out especially since they were fairly expensive.

I will be completely honest, I don’t think that a comb or a clip will be able to hold this up.  There is quite a bit of weight from the roses plus all the volume of the netting, which made me think that a thin metal headband would be better.  So I cut another of the felt circle base to be able to glue the fascinator to.  Hot glue ended up being the best way to attach the fascinator onto the headband.


Dollhouse Designs Fiesta Folklorico Skirt

The Hearts for Hearts dolls haven’t had any new clothes in a while.  So first up was Consuelo.  I already had Consuelo a nice rose-colored t-shirt and wanted something to go with it.  In the end I decided on Dollhouse Design’s Fiesta Folklorico pattern.  It gives options for two dress styles, a peasant style blouse and two skirt options.  I decided to go with the long skirt option with ruffle at the bottom.

Next step was finding fabric for Consuelo’s skirt and out of all the fabric at home nothing seemed to work well.  Friday after paying my mortgage and getting a library book, I went fabric shopping for Consuelo’s skirt.  I picked her out a quilting cotton that has a blue schemed floral pattern on it.  It should work well with her pink shoes and rose top.

This is the first Dollhouse Designs pattern I have used.  The PDF was sixty pages.  The instructions were well written and had great pictures.  I didn’t use the instructions much.  Everything seemed pretty intuitive.

The skirt went together very easily.  The most difficult part was gathering the bottom ruffle to fit. My ruffle was longer than suggested.  I probably had a 89 inch ruffle but I wasn’t going to over think where to trim it for an 86 inch ruffle.

The biggest change I made was switching the skirt from Velcro enclosure to an elastic enclosure.  As Consuelo is a 14 inch doll, she has a waist that is almost a quarter of an inch smaller than the Wellie Wishers.  I did baste in the back for a smaller waistline but really thought it was too much of an overlap.  So instead, I cut a 6.5 inch piece of half- inch elastic and threaded it through the waist band and then sewed the back seam at 3/8 inch.  The skirt was a little tight sliding over Consuelo’s hips but otherwise, it fits her perfectly.